A few months ago, I made some paper and wanted to use it in some cards.
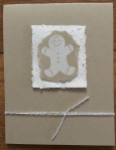
 For Christmas, I had grand plans for a cool card that had a little gingerbread man stamped directly on the handmade paper. However, I completely forgot that the paper was still textured and the image barely showed up. It didn’t occur to me to iron the paper or flatten it using my Cuttlebug, so I went with plan B and just used the paper as a background panel. It turned out cute and simple, so I was fine with it.
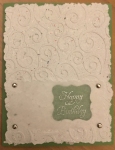
 Then for birthday cards, I decided to use an embossing plate to give it a swirly texture. My big plan for this one was to have a hole punched in the textured paper and then stamp the sentiment on the main card paper through the hole. Um, not as easy as it seemed in my head. Again I turned to my trusty plan B. I grabbed some tracing paper (I hope to find my vellum one of these days) and a test panel I made with regular copy paper to line up where to stamp the sentiment. Then I just attached it with brads. Similar effect with a little more visual interest. I love when plans change for the better!
Oh, and I still hadn’t noticed that the Cuttlebug could flatten the paper. That revelation came while making another card where I only wanted the texture on part of the paper (brainfarted and didn’t get a picture of that card). I finally noticed that the parts that had been through the embossing folder were smooth while the other parts were still had the original handmade paper texture. So I carefully put the part that needed to be flattened on top of an embossing folder and ran it back through the machine. It worked! Woohoo! I couldn’t believe I hadn’t figured that out sooner. I’m a smart woman, but holy crap I can be dense some days.
But now I know for the future and I hope this saves someone from frustration. Here is how each card ended up being made:
Christmas card:
For this card, I used the Scentsational Season stamp set from Stampin’ Up!, craft paper, handmade paper, white craft ink, glitter, and some white and silver twine.
- Stamp the gingerbread man on a piece of craft paper and let it dry. I stamped a full sheet (leaving room for tearing) and let it dry for a full day before doing anything else with it.
- Tear handmade paper into a rectangle.
- Tear a gingerbread man leaving space around the image, but keeping it smaller than the handmade paper triangle.
- Glue the stamped image to the rectangle and use Stampin’ Dimensionals to place the rectangle on the card.
- Tie twine around the bottom of the card (this card opens at the top, rather than the side).
Birthday card:
This card has a sentiment from the Elementary Elegance from Stampin’ Up!, Wild Wasabi paper, handmade paper, tracing paper, silver ink, and brads.
- Tear a large rectangle of handmade paper.
- Use and embossing folder to give texture to the paper rectangle.
- Punch a hole in the lower right-hand corner. I suggest making a second panel using just copy paper so you have a template for stamping the sentiment.
- Tear a rectangle piece of tracing paper (apparently I have been in a paper-tearing sort of mood lately).
- Stamp the sentiment on the tracing paper using the template.
- Attach the tracing paper to the handmade paper using brads.
- Attach the handmade paper panel to the card using Stampin’ Dimensionals.
