In my last metal clay class, we focused on kinetic rings. In the past we have only worked with Art Clay, but this time we also used FYI Silver Metal Clay by Val Lewis.
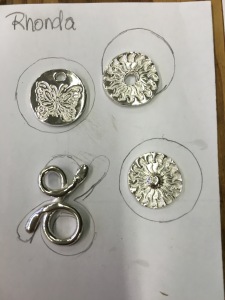
 We started with the FYI clay because it needs to be fired in a kiln and we needed the pieces to be ready for the next steps for making the rings. I hadn’t worked with this clay before, but it was quite nice. We used 10 grams of the FYI clay, and I was able to make the 4 pieces you see here. For reference, the round pieces ended up about the size of a penny. (Note that it is tough to take nice pictures during class with your phone with silver all over your hands. :))
One thing to note about the FYI clay is it has a higher shrinkage rate than the Art Clay. The picture on the right shows pencil lines that were drawn before firing. You can see the pieces shrank about a 20-25%. The advantage to this is you could create very small designs more easily because you’d have more clay to work with before it shrinks.
I had some extra clay after making the 2 pieces for the spinner ring. I used it to make a small butterfly pendant for 1 of my nieces and another squiggle piece that I plan to use as part of a necklace. Of these 4 pieces, the squiggle is my favorite. I want to make more pieces like this simply because they are more my style.
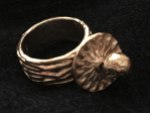
 The next week we used the Art Clay to start making the shanks for rings. The 2 sun pieces I had made with the FYI clay were intended to go on a stacking spinner ring. I ended up only using 1 on it, because 2 seemed too big for me. Frankly, even 1 was too much for me, but it looks pretty cool having the spinning disk.
A wire was fired into the shank and the spinning piece was placed on it. Then the end was cut and a little loop was formed to hold the topper, which keeps the spinner from coming off. It was an interesting process and I would probably do some things differently next time (thinner shank, smaller spinner, smaller topper… basically, make it less bulky).
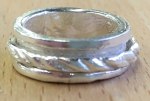
The other ring I made was a fidget ring, and it is my favorite! It was fun to make and I love wearing it. I might drive people around me nuts constantly playing with it, though.
 For this ring, we made the shank and put rims on the edges to keep the spinning part from coming off. The tricky part was putting on the spinner. We wrapped the shank in paper to keep the parts from sticking together (still in clay form at this time) and to make the spinner a little bigger than the shank so it would spin. When it was fired, the paper burned out and the fidget ring was born (after some work to get the spinner to spin, which was the case for pretty much everyone in the class).
In hindsight, this ring would be easier to make if the shank was fired first then the spinner put on. Regardless, it was a fun process to try and the result was great. I would definitely make another one of these rings.
As I have mentioned before, working with metal clay is a blast. If you want to try it, I highly recommend taking a class in person with an instructor. You will likely have questions that need to be answered before your clay dries out on the table in front of you and having someone right there to ask is incredibly helpful.
