Cards from Gelli Plate Prints

A couple of months ago, I made my first Gelli Plate prints and had a blast. I decided to try making some cards using inspiration from a site I found through Pinterest.

Card using Gelli Plate print circles

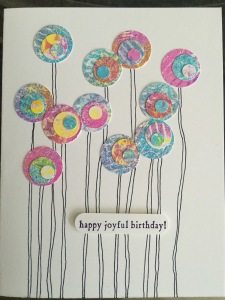
I enjoy the abstract look of this card. The circles look like flowers to me, but I also think they look like balloons. Either way, it is fun and the colors are happy.

The other thing I really like about this card is each card turned out to be a bit unique. (Quick side note… I usually pick a design each year and everyone gets the same card. Lazy? Perhaps. I think of it as practical, because time to sit and make cards can be scarce.) All five of the cards I made have the same design, but the flowers have their own colors and patterns and are in slightly different arrangements.

These cards were easy to make, but a little time-consuming because of all of the circle punching. I used three different sizes of circle punches on the prints I had made. The punches were made in different areas of the prints to try and get a variety in colors and patterns. Then the circles were put together with roll-tape adhesive. Continue reading

First Gelli Prints - Finished

Gelli Plate Printing

First Gelli Prints - Supplies UsedI made prints using my Gelli Arts Printing Plate for the first time, and I now understand why other posts about it say it is so addictive. I could make prints with this for hours, if not days or until my paint and ink resources run out.

Seriously.

This was a blast.

Why? Because it is absolutely fascinating to see how the prints turn out.

For my first attempt at this, I grabbed out the Gelli plate, of course, and placed it on an old cookie sheet. I tend to get a little carried away and make a mess when I try new things, and the cookie sheet helped to protect my work surface. It also made moving the plate around easier which allowed me to work with and view it from different angles. (If you don’t have a cookie sheet to devote to this, I think wax or parchment paper would work fine.)

Then I grabbed some of the items that I have been saving like a little packrat to use for texture. In this case, it was bubble wrap, corrugated cardboard, some crinkled paper that had been used as packing material, and some heavier brown paper with an interesting pattern cut into it, which had also been used as packing material. Lesson learned here – hang on to that packing material because it has some cool texture to it. I also grabbed a brayer and a sponge for spreading the paint on the Gelli plate. Continue reading