Making Paper

First of all… Happy New Year!

I realized I haven’t posted in a couple of months. NaNoWriMo took up most of my time, energy, and words in November (I won with 50,115 words… woohoo!!). Then December brought a big project for work and making Christmas cards at home (post coming soon about the cards). My plan for cards involved making paper, so I spent a couple of hours doing just that.img_2142

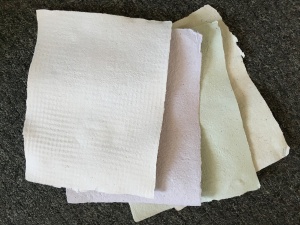
In early fall, I bought a paper making kit from Paper Alice and was happy with how easy it was to make the paper. I managed to make a huge mess in my kitchen, but that just means it was more fun, right?

The kit had good instructions with pictures, so I just followed those. I didn’t take pictures while I was making the paper because my hands were dripping wet most of the time and I didn’t think ahead to grab an extra towel and my phone or a camera to take pictures. Next time…

The basic instructions were to tear up some paper and put it in a blender, cover it with water, blend the crap out of it, pour it in the frame, then take it out to let it dry. There is a little more to it than that, but that was basically how easy it was. Continue reading

Copy And Share Everything

If you have been on the Splitcoaststampers site, you have likely seen the term CASE on several posts. In case you were wondering what that means, it stands for Copy And Share/Steal Everything. Basically, Splitcoaststampers is a huge community of people stealing like artists. 🙂

This is one of the many reasons I love this site. It is a great place for inspiration and everyone wants to inspire everyone else. You can practically feel the love when you look through the posts. (Ok, that might be overstating it, but it is nice looking through the beautiful work people want to share.)

A few months ago, I found a card posted on Splitcoaststampers by sistersandie in the gallery for the Gorgeous Grunge set (one of my favorite sets). I liked how she used the stamps to make a stripe of splats. It seemed like a perfect Father’s Day card, so I decided to CASE it. Continue reading

Better Late than Never

Inspiration can show up at any time – on a walk in a park, talking with a friend, searching for ideas online. Sometimes we act on ideas from the inspiration immediately. Other times the ideas get set aside for one reason or another.

When I was coming up with an idea for a Mother’s Day card a few weeks ago, I remembered an inspiration challenge I had seen on SplitCoastStampers.com and the design idea I had for it. I went to look up the challenge and found it had been posted 9 years ago.Mothers' Day Card

This idea had been rolling around in my head for 9 years and I hadn’t acted on it yet!

I felt like such a slacker.

Then I remembered the saying of “better late than never” and decided to get over it and move forward with finally using the design.

The inspiration challenge image was one of the simple line drawings from Pablo Picasso. He is one of my favorite artists and I love these drawings. I immediately thought of the Heartfelt Thanks set by Stampin’ Up! because it had the line art of a flower. I wanted to use the line stamp in black ink with the partner stamp of the whole flower in clear heat embossed powder over it. But I never thought of a layout I liked for it, never found the time to sit and play with it, excuses, excuses, excuses.

Then a few weeks ago, I was back on SplitCoastStampers.com and saw a card posted by Penny627 that she made for a Try a New Technique challenge. I really liked the layout and it felt perfect for the line art idea. Continue reading

Cards from Gelli Plate Prints

A couple of months ago, I made my first Gelli Plate prints and had a blast. I decided to try making some cards using inspiration from a site I found through Pinterest.

Card using Gelli Plate print circles

I enjoy the abstract look of this card. The circles look like flowers to me, but I also think they look like balloons. Either way, it is fun and the colors are happy.

The other thing I really like about this card is each card turned out to be a bit unique. (Quick side note… I usually pick a design each year and everyone gets the same card. Lazy? Perhaps. I think of it as practical, because time to sit and make cards can be scarce.) All five of the cards I made have the same design, but the flowers have their own colors and patterns and are in slightly different arrangements.

These cards were easy to make, but a little time-consuming because of all of the circle punching. I used three different sizes of circle punches on the prints I had made. The punches were made in different areas of the prints to try and get a variety in colors and patterns. Then the circles were put together with roll-tape adhesive. Continue reading

First Gelli Prints - Finished

Gelli Plate Printing

First Gelli Prints - Supplies UsedI made prints using my Gelli Arts Printing Plate for the first time, and I now understand why other posts about it say it is so addictive. I could make prints with this for hours, if not days or until my paint and ink resources run out.

Seriously.

This was a blast.

Why? Because it is absolutely fascinating to see how the prints turn out.

For my first attempt at this, I grabbed out the Gelli plate, of course, and placed it on an old cookie sheet. I tend to get a little carried away and make a mess when I try new things, and the cookie sheet helped to protect my work surface. It also made moving the plate around easier which allowed me to work with and view it from different angles. (If you don’t have a cookie sheet to devote to this, I think wax or parchment paper would work fine.)

Then I grabbed some of the items that I have been saving like a little packrat to use for texture. In this case, it was bubble wrap, corrugated cardboard, some crinkled paper that had been used as packing material, and some heavier brown paper with an interesting pattern cut into it, which had also been used as packing material. Lesson learned here – hang on to that packing material because it has some cool texture to it. I also grabbed a brayer and a sponge for spreading the paint on the Gelli plate. Continue reading

Creatively Improvising

Last week, creativity came in the form of needing to improvise a little on wrapping a gift for my niece who is turning 4.

I searched through my wrapping paper only to find that the only thing I had that was close to birthday paper was plain, cobolt blue paper. Not ideal for a girly girl who likes sparkle, but I needed to get the gifts wrapped and ready to ship that night. No time to run out and buy more wrapping paper. Fortunately, her favorite color at the moment is blue.

So I grabbed some silver, gold, and copper metallic paper and some of my Stampin’ Up! punches. Then I punched out several metallic hearts, butterflies, and flowers and put them all over the blue wrapping paper. I wish I had remembered to take a picture because it turned out pretty cute.

Before wrapping her gift, I didn’t really have an idea in mind for a card yet, Butterflies Birthday Cardother than wanting to put 4 of something on it for her fourth birthday. An added bonus of decorating the gift with the punched shapes was that it gave me an idea for the card.

The butterflies in silver were my favorite shapes on the gift, so I punched out 4 more of them. It’s tough to see in this photo, but they are shiny and placed on the card with dimensional tape.

Keeping with the “4” theme I put 4 strips of paper behind the butterflies. They are cut as not perfect rectangles so they look a little more interesting. The card turned out cute and I liked having the card kinda coordinate with the wrapping with the silver butterflies.

While it would have been nice and a lot quicker to have actual birthday wrapping paper on hand, it was a lot of fun finding a way to make what I did have work.